Wooden floors are tough, but sooner or later, they pick up a scratch, scuff, or mystery mark. The good news? If the damage isn’t too serious, we can usually do a small repair to avoid any major work, just a bit of sanding and re-lacquering. Here’s a simple step-by-step guide on how we would do it.
The floor in this case study was marked by a large piece of furniture with a dark stain that became damp during storage.
Step 1: Clean the Area
For rooms with furniture, the team are always happy to help move oversized items, such as beds and wardrobes, that require a two-man lift. We ask that all valuables, precious items, clothing, and small items be removed prior to arrival.
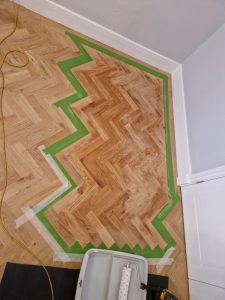
Start by giving the marked spot a good clean. Remove dirt, dust, and grease, so you’re not sanding grime into the floor. Let it dry completely before moving on. We then use masking tape, then Frog Tape on top, to contain our sanding to one area. This only works when you know exactly what primer and lacquer were used before!
Step 2: Lightly Sand the Mark
Using fine sandpaper, we then gently sand the stain and the areas around to remove the old lacquer and the damaged area. The goal is to remove only the damaged finish and fade the mark, without digging into the wood.
Step 3: Clean the Area
Next, we vacuum or wipe away all the dust. A clean surface is important, so the new finish goes on smoothly and the primer and lacquer adhere properly. .
Step 4: Apply the Primer
The primer is essential to ensure the lacquer adheres properly, but note that primer application can lift the wood grain, so after each application, we lightly sand again with a 240-grit pad to keep the final finish smooth.
Step 5: Apply the Lacquer
It is very important to apply the lacquer in the same manner as the rest of the floor to ensure the final texture is consistent. In this case, we used a short-pile roller to apply a thin coat of floor lacquer, ensuring an even finish with no pooling. Thin coats work best and dry more evenly. As we use the combination of masking and frog tape, I was able to confidently roll right up to the edges of the tape without any bleed onto the exsiting floor.
Step 6: Let It Dry and Repeat
Once dry, lightly sand again with very fine sandpaper to remove any mor lifted grains, clean off the dust, and apply another coat. Two to three thin coats are usually enough.
Step 7: Let It Cure
Avoid walking on the repaired area for at least 24 hours. The lacquer will continue to harden over the next few days, so avoid heavy use if you can.
Final Tip
Always match the type of lacquer already on your floor, and test products in a hidden spot first.
With a little patience, most floor marks can be fixed —saving you time, money, and the hassle of replacing boards.
If you have a wood floor that needs this type of repair, get in touch today, and we will be happy to help.

At Warson Flooring, we are experts in floor installation – so it’s safe to say we know what we’re doing. Our team loves everything about flooring. We pride ourselves on providing tailored advice to help you make the best choice. For more information about LVT, Wood Flooring or Carpets, get in touch with us today.